In a recent post we created an email backend using Node and nodemailer, and
now we’ll move on to improve that same backend with Handlebars templates. You can check out that post here,
and use the same final code.
To make our lives a bit easier without having to create a specific compiler, we’ll use the ready made one nodemailer-express-handlebars
Prequisites
- Code used in earlier post
npm install nodemailer-express-handlebars
What is Handlebars.js?
Handlebars.js extends the Mustache templating language. According to the documentation, Mustache templates are logicless, meaning that they contain no if-else clauses or for loops. They simply expand the tags in the template and adds the values that we have provided1.
This is where Handlebars.js comes in. Handlebars provides us with all the good things from Mustache templates, but it also gives us the ability to handle logic.
Creating a basic Handlebars template
Let’s start by creating a new directory called templates, and inside that create email_template.hbs.
This means we’ve got the following folder setup in our backend:
- index.js
- templates
- email_template.hbs
For now, we’re just going to move the code from our earlier example to this,
so the email_template.hbs will look like this:
<div>Welcome ! This is my first nodemail!</div>The only change we’ve made, is ${name} to {{ name }} for handlebars.js to be able
to interpret the context. This is how values are defined in the template.
Integrating nodemailer-express-handlebars into our app
To actually be able to use this, we need to modify our nodemailer setup to
use our plugin as the compiler. First we need to import the package at the top of our file:
const hbs = require('nodemailer-express-handlebars')
and then we need to actually use the compiler in our transporter:
transporter.use('compile', hbs({
    viewEngine: {
        extname: '.hbs',
        layoutsDir: 'templates/',
        defaultLayout: false,
        partialsDir: 'templates/',
    },
    viewPath: 'templates/',
    extName: '.hbs'
}));
The creators of nodemailer have made it possible to inject plugins, and that’s what we’re doing here. The first thing we tell the transporter is to hook in the plugin at ‘compile’ time. This is the step where the email data is supposedly set, but modifications can still be made, such as modifying the html that we’re doing with handlebars2.
Brief explanation of options
- viewEngine:
- extname: The file ending that we use for our handlebars files, can be
.handlebars - layoutsDir: The relative directory where we keep our templates
- defaultLayout: We’ll set this to false because apparently it only sends this otherwise
- partialsDir: Where we store headers, footers and other layouts that are reused
- extname: The file ending that we use for our handlebars files, can be
- viewPath: Pretty much the same as
layoutsDir - extName: Same as
extname
Adding variables to a Handlebars template
Now it’s time to modify the ´send-email´ to accommodate the template. There’s only a few
app.post('/send-email', async (req, res) => {
    const name = 'Anonymous'
    try {
        transporter.sendMail({
            from: 'Anonymous Coder<YOUR_EMAIL>',
            to: 'YOUR_EMAIL',
            subject: 'Your first nodemail',
            template: 'email_template',
            context: {
                name: 'Anonymous Coder'
            }
        }, () => {
            res.status(200).send('Email sent')
        })
    } catch {
        return res.status(400).send('Email not sent')
    }
})
That’s as that! Just remove the html entry form the object, and add
template: 'email_template' and the context object.
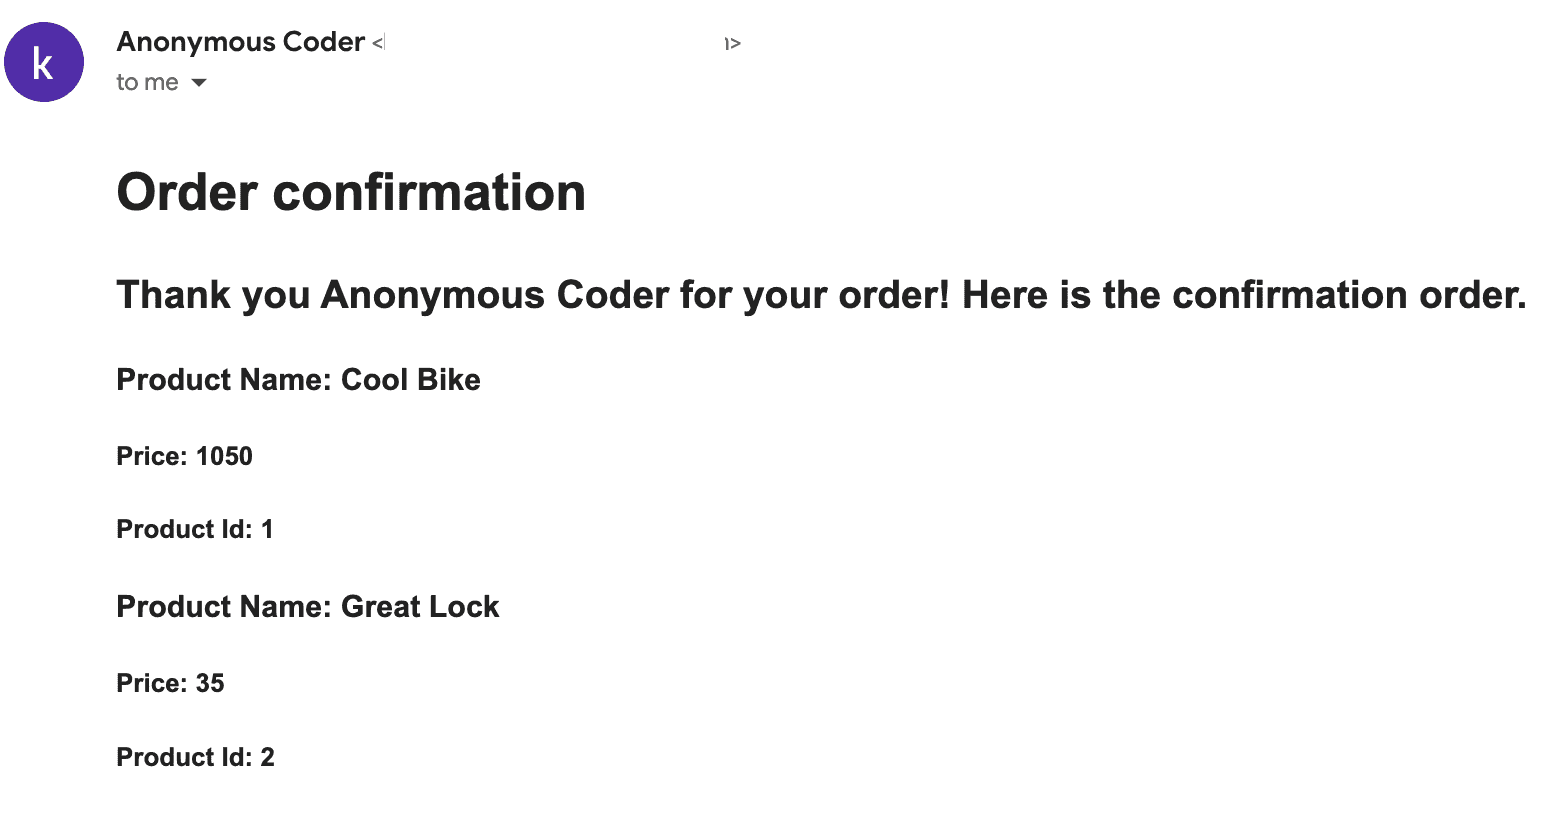
Arrays in Handlebars
One of the benefits of using Handlebars templates together with nodemailer, is that you can add arrays in the context.
In this example I’ll add an array of objects, for example an order template. We’ll have objects of products, for example like this:
const products = [{
    productId: 1,
    productName: 'Cool Bike',
    price: 1050
},
{
    productId: 2,
    productName: 'Great Lock',
    price: 35
}]
Now we have a simple array of objects, let’s create a new template order_confirmation_template.hbs,
and add a new route send-confirmation-email to divide these to templates.
Let’s start by adding the new route with the products.
app.post('/send-confirmation-email', async (req, res) => {
    const products = [{
        productId: 1, productName: 'Cool Bike', price: 1050
    }, {
        productId: 2, productName: 'Great Lock', price: 35
    }]
    try {
        transporter.sendMail({
            from: 'Anonymous Coder<YOUR_GMAIL>',
            to: 'YOUR_GMAIL',
            subject: 'Product Confirmation',
            template: 'product_confirmation_template',
            context: {
                name: 'Anonymous Coder', products: products,
            }
        }, () => {
            res.status(200).send('Email sent')
        })
    } catch {
        return res.status(400).send('Email not sent')
    }
})
There’s nothing much new here from the earlier example, we’ve just added the products to the context.
Now on to the Handlebars template.
<div>
<h1>Order confirmation</h1>
<div>
<h2>Thank you for your order! Here is the confirmation order.</h2>
</div>
<div style="margin-top: 10px;">
<h3>Product Name: </h3>
<h4>Price: </h4>
<h4>Product ID: </h4>
</div>
</div>So to specify an array in a Handlebars template, we simply use
#each products or #each <YOUR_ARRAY_IN_CONTEXT>. If this was an array
without any objects, we could just use:
<h3></h3>
to show the user the elements in the array.
The with-helper tells the Handlebar to evaluate the context differently,
so for example with the first object this becomes:
const this = {
    productId: 1,
    productName: 'Cool Bike',
    price: 1050
}
and thereafter we can use it as a JS object to get the values of each key.
Final code
In the end, your code should look something like this:
const http = require('http');
const express = require("express");
const nodemailer = require('nodemailer')
const hbs = require('nodemailer-express-handlebars')
const app = express();

const transporter = nodemailer.createTransport({
    service: "Gmail",
    port: 587, secure: true, auth: {
        user: "YOUR_GMAIL", pass: "YOUR_APPLICATION_PASSWORD"
    },
});

transporter.verify((error, success) => {
    if (error) console.error(error);
    console.log("Server is ready to take our messages");
});

transporter.use('compile', hbs({
    viewEngine: {
        extname: '.hbs',
        layoutsDir: 'templates/',
        defaultLayout: false,
        partialsDir: 'templates/',
    }, viewPath: 'templates/', extName: '.hbs'
}));

app.post('/send-confirmation-email', async (req, res) => {
    const products = [{
        productId: 1, productName: 'Cool Bike', price: 1050
    }, {
        productId: 2, productName: 'Great Lock', price: 35
    }]
    try {
        transporter.sendMail({
            from: 'Anonymous Coder<YOUR_GMAIL>',
            to: 'YOUR_GMAIL',
            subject: 'Product Confirmation',
            template: 'product_confirmation_template',
            context: {
                name: 'Anonymous Coder', products: products,
            }
        }, () => {
            res.status(200).send('Email sent')
        })
    } catch {
        return res.status(400).send('Email not sent')
    }
})

app.post('/send-email', async (req, res) => {
    try {
        transporter.sendMail({
            from: 'Anonymous Coder<YOUR_GMAIL>',
            to: '<YOUR_GMAIL>',
            subject: 'Your first nodemail',
            template: 'email_template',
            context: {
                name: 'Anonymous Coder'
            }
        }, () => {
            res.status(200).send('Email sent')
        })
    } catch {
        return res.status(400).send('Email not sent')
    }
})


const server = http.createServer(app);

server.listen(process.env.PORT || 4000, () => {
    console.log(`Server running on port ${4000}`);
});
Wrap-up
In this post, we’ve gone through how you can use Handlebars.js to power-up your emails.